In the United States, over 60% of homeowners acknowledge that a disorganized closet significantly increases their daily stress levels. Surprisingly, a well-designed walk-in closet can drastically reduce morning preparation time by half. This detailed guide delves into the fusion of style and organization in walk-in closets, aiming to enhance daily routines, safeguard clothing, and elevate home value. It explores the practical advantages of elegant walk-in closets and the significance of thoughtful designs for all, from families to professionals. Such designs ensure effortless access and enduring organization. For Lasting Storage Efficiency
Walk-In Closets
Essential terms are clarified: walk-in closets and walk-in closets are synonymous; custom walk-in closets involve bespoke layouts and finishes. In practical terms, closet systems for walk-in closets encompass both modular and built-in options; small walk-in closets and luxury walk-in closets describe their size and aesthetic level. For Better Closet Organization
This article examines planning, materials, systems, and customization choices—ranging from stock to fully custom. In practical terms, it also covers installation options and budgeting. For those seeking professional closet systems, custom walk-in closets, and local installation, www.closetorganizersystems.com serves as a valuable resource. It allows users to explore designs and connect with installers in their area. For Lasting Storage Efficiency
Planning Your Walk-in Closet Layout For Maximum Function
Effective planning transforms chaos into serenity. Begin by cataloging your wardrobe, footwear, accessories, and travel gear. Enumerate dresses, suits, and shoes meticulously. Identify which items are daily essentials and which are seasonal. In practical terms, position everyday attire near the entrance for swift dressing in the mornings. For Lasting Storage Efficiency
Accurate measurements are essential before making any purchases. Record the ceiling height, wall dimensions, door swing directions, window positions, vents, and outlets. Note any irregularities such as odd angles, knee walls, alcoves, and sloped ceilings on a detailed sketch or photograph. In practical terms, designers and installers appreciate precise drawings. In practical terms, in confined spaces, consider vertical storage for bins and luggage. For Better Closet Organization
Use a zone-based layout to emulate a boutique’s efficiency. In practical terms, designate an entry zone for bags, keys, and quick changes. Organize hanging areas by garment length: short for shirts, medium for pants, and long for coats and dresses. In practical terms, reserve shelving for folded items and accessories. Deep storage is ideal for seasonal bins and luggage. For Lasting Storage Efficiency
Adopt a five-zone concept, similar to garage planning: entry, active/accessible, display/feature, deep/seasonal, and auxiliary for a bench or island. In practical terms, this approach balances visibility and accessibility. In practical terms, place daily items in the active zone and seasonal items in deep storage to streamline searches. For Lasting Storage Efficiency
Practical dimensions are critical. In practical terms, long coats require 60–72 inches of hanging space. In practical terms, aim for 24 inches of depth for hanging rods to prevent garment creasing. In practical terms, ensure a 36-inch clear aisle for easy movement. In extremely tight spaces, a 30-inch aisle can suffice with a well-planned layout. For Better Closet Organization
| Checklist Important Point |
In practical terms, why It Matters Key Detail |
In practical terms, quick Tip Important Point |
| Inventory and counts Important Point |
In practical terms, shows exact storage needs and prevents overbuying Important Point |
List daily vs. In practical terms, seasonal items on two columns Important Point |
| In practical terms, full measurements Important Point |
In practical terms, prevents surprises during installation Key Detail |
Include ceiling height and door swings Important Point |
| In practical terms, zone map Key Detail |
Improves daily flow and access Important Point |
Sketch zones to scale on graph paper Important Point |
| Clearances Key Detail |
Ensures comfortable use and accessibility Key Detail |
Target 36″ aisle; 30″ minimum if needed Key Detail |
| In practical terms, vertical options Important Point |
In practical terms, maximizes storage in small footprints Important Point |
Use overhead shelves and stacked shelving Important Point |
Seeking professional help early is advisable. In practical terms, use search terms like walk in closets systems near me or walk in closets near me to find local experts familiar with local codes and regulations. In practical terms, compare showroom samples from brands like California Closets or Elfa to evaluate materials and finishes firsthand when designing your walk-in closet. For Better Closet Organization
For compact rooms, explore closet designs for small walk-in closets that incorporate slim islands, sliding doors, and mixed-depth shelving. These features maintain an open feel while providing designated spaces for various items. For Better Closet Organization
In Practical Terms, Walk In Closets Designs
Effective walk in closets merge aesthetics with practical storage solutions. In practical terms, begin by strategizing the layout to ensure daily essentials are accessible. Balance open shelving for shoes or accessories with concealed drawers to manage clutter. Select finishes and hardware that complement the bedroom’s decor for a unified appearance. For Better Closet Organization
 Walk In Closets
Opt for lighting, ventilation, and robust flooring to maintain a comfortable and enduring space. Consider materials like thermally fused laminate or engineered substrates for areas prone to moisture. In practical terms, ensure hardware and shelving are adjustable to extend the closet’s lifespan. For Better Closet Organization
Design Principles That Balance Style And Function
Organize the closet into zones for hanging, shelving, and display to ensure each item has its designated spot. Position everyday clothes at eye level and reserve higher shelves for less frequently used items. Incorporate a combination of open and closed storage to highlight favorites while keeping the closet organized. For Lasting Storage Efficiency
Integrating Closet Systems For Walk In Closets With Customized Layouts
Start with modular closet systems as a foundational base, comprising shelves, drawers, and rods. In practical terms, adapt these with custom pieces to fit unique spaces, such as alcoves or sloped ceilings. In practical terms, custom designs bridge the gap between standard modules and the closet’s architectural nuances. For Better Closet Organization
Choose finishes that endure wear and tear. Thermally fused laminate is a suitable choice for many U.S. homes. Verify that the system includes adjustable shelving and durable hardware to accommodate future needs. For Better Closet Organization
In Practical Terms, Design Examples For Small Walk In Closets And Large Walk In Closets
Small walk in closets benefit from vertical storage and multifunctional elements. In practical terms, consider slim pull-outs, mirror-front drawers, sliding doors, and compact islands that serve as dressing surfaces. For closets under 6’x6′, maximizing space is critical. For Lasting Storage Efficiency
For larger closets, consider center islands, seating, and dedicated display cases for accessories. In practical terms, designate separate shoe walls, multiple hanging areas, and a dressing zone with focused lighting. In practical terms, closets 10’x10′ and larger can accommodate islands and distinct zones without feeling overwhelming. For Lasting Storage Efficiency
Homeowners often review portfolios from reputable closet brands and installers before selecting a design. This approach helps in choosing the perfect custom walk in closets near me. For Lasting Storage Efficiency
In Practical Terms, Custom Walk-in Closets: Benefits And When To Choose Them
The decision between ready-made units and custom options significantly impacts both function and style. In practical terms, custom walk-in closets offer a precise fit, tailored storage solutions, and finish options that perfectly align with a home’s aesthetic. In practical terms, they are ideal for addressing irregular layouts and seamlessly integrating with built-ins, creating a cohesive look. For Better Closet Organization
In Practical Terms, Differences Between Stock, Semi-custom, And Fully Custom Options
Stock units are economical and readily available, featuring fixed sizes and basic finishes. While they are suitable for standard rooms, they restrict personalization options. For Better Closet Organization
Semi-custom closet systems offer more flexibility in finishes, drawer fronts, and spacing, yet remain within a manufacturer’s system. This option allows for upgrading key elements without the expense of bespoke construction. For Lasting Storage Efficiency
Bespoke closet systems are tailored to exact dimensions and unique requirements. Custom walk-in closets provide bespoke inserts, concealed features, and matching cabinetry, creating a unified bedroom suite. For Better Closet Organization
When Fully Custom Is The Practical Solution
Choose full customization when dealing with angled walls, HVAC ducts, or windows and electrical panels that disrupt the space. Custom walk-in closets excel in historic homes and loft conversions, where precise fit and finish are critical. For Better Closet Organization
For homeowners desiring specialized features—such as hidden ironing centers, jewelry drawers, or coordinated millwork—custom work is the only viable option. In practical terms, architects and interior designers often specify custom pieces to maintain design integrity. For Lasting Storage Efficiency
Cost Considerations And Return On Investment
Pricing varies based on materials and scope. In practical terms, stock modules are the most affordable. Semi-custom walk-in closets fall in the mid-range, providing solid value with targeted upgrades. Fully custom jobs can range from modest to high five-figure investments. For Better Closet Organization
Properly designed custom walk-in closets can significantly enhance buyer appeal and perceived home value. To safeguard this investment, review warranties, check hardware weight ratings, and select durable finishes. For Lasting Storage Efficiency
Obtain multiple quotes, compare timelines, and weigh aesthetic goals against durability. In practical terms, for design consultations and portfolios, consider professional closet specialists who showcase real installations and client references. For Lasting Storage Efficiency
In Practical Terms, Best Closet Systems For Walk In Closets
Choosing the right closet system can significantly enhance your daily routine. Begin with a modular system that evolves with your evolving needs. In practical terms, modular systems, including shelving towers, adjustable uprights, and peg-and-rail configurations, enable effortless reorganization without necessitating a complete overhaul. For Lasting Storage Efficiency
Brands such as Elfa, ClosetMaid, and California Closets offer modular and customizable solutions, providing unparalleled flexibility. In practical terms, shelving towers serve as the foundation for folded items. Adjustable uprights cater to varying hanging heights. Peg-and-rail systems, on the other hand, introduce additional storage without the need for new holes. For Lasting Storage Efficiency
For walk-in closets, prioritize items you use daily. Opt for drawers with full-extension and soft-close mechanisms for effortless access. Incorporate adjustable rods for dual hanging capabilities. In practical terms, consider pull-out shoe racks and slanted shoe shelves to maintain footwear organization. For Lasting Storage Efficiency
Utilize clear display cubbies for handbags and belts. Include jewelry inserts and lockable drawers for secure storage of valuable items. In practical terms, a few pull-out trays for accessories can significantly reduce clutter, streamlining your morning routine. For Better Closet Organization
In smaller walk-in closets, opt for slim-profile systems to preserve visual openness. In practical terms, over-door organizers and vertical shoe storage maximize floor space. In practical terms, incorporate fold-away ironing boards and narrow shelves to maintain accessibility in compact spaces. For Lasting Storage Efficiency
Spacious walk-in closets can accommodate more extensive features, such as islands with drawers, multiple hanging heights, and dedicated shoe walls. In practical terms, integrated laundry hampers and open display sections enhance dressing experiences, adding a touch of luxury. For Lasting Storage Efficiency
Before purchasing, verify the hardware’s quality and its weight limits, ensuring stability for heavy items like shoe racks and folded garments. In practical terms, emphasize durability and adjustable shelving to prevent your closet system from becoming outdated prematurely. For Lasting Storage Efficiency
For many homeowners, the quintessential closet system for walk-in closets strikes a balance between high-quality components and adaptable design. Aim for a customizable closet that seamlessly integrates practical organizers with robust hardware and the ability to reconfigure easily. For Lasting Storage Efficiency
In Practical Terms, Materials And Finishes That Matter For Longevity
The longevity of a walk-in closet hinges on the selection of materials and finishes. Beyond mere aesthetics, the quality of the substrate and the hardware’s durability are critical. Opt for materials that can withstand moisture, support screws, and endure daily wear and tear. For Lasting Storage Efficiency
TFL, when paired with stable cores, offers a sleek appearance and enhanced moisture resistance over raw wood. In practical terms, tFL closet systems, combined with engineered substrates, resist warping in environments with fluctuating humidity. Precise panel cutting ensures tight joints and aligned doors. For Better Closet Organization
When planning for hanging and shelving, consider the weight ratings of the hardware. Specify load ratings for closet rods, shelf pins, drawer slides, and shoe racks. Employ full-extension drawer slides and soft-close hinges to minimize drawer and cabinet wear. For Lasting Storage Efficiency
Opt for adjustable shelving with metal standards and heavy-duty brackets for optimal performance. In practical terms, such systems facilitate reconfiguration as your wardrobe evolves. The combination of durable materials and robust hardware minimizes sagging and simplifies future upgrades. For Better Closet Organization
Do not use solid wood in areas without climate control due to its tendency to expand and contract with humidity and temperature changes. This can lead to cracks or warped doors. In practical terms, reserve solid wood for climate-stable interiors or choose engineered veneers for a luxurious look without the instability. For Better Closet Organization
For corrosion resistance, select powder-coated or plated hardware. In practical terms, durable edge banding seals panel edges and prevents peeling on TFL and other laminated panels. Small upgrades to substrate and hardware yield significant improvements in longevity. For Lasting Storage Efficiency
If you want quick comparisons when selecting components, consider this layout: For Better Closet Organization
| In practical terms, component Key Detail |
In practical terms, best Choice Important Point |
Why It Works Key Detail |
| In practical terms, panels Important Point |
TFL on engineered substrates Important Point |
In practical terms, moisture resistance, precision cutting, low maintenance Important Point |
| Shelving system Key Detail |
In practical terms, metal standards with heavy-duty brackets Key Detail |
In practical terms, adjustable, strong, easy to reconfigure Important Point |
| In practical terms, hanging rods Key Detail |
Steel rods with clear hardware weight ratings Key Detail |
Supports heavy garments, prevents sag Important Point |
| In practical terms, drawers Key Detail |
Full-extension slides, soft-close Key Detail |
Smoother operation, reduced wear, higher load capacity Key Detail |
| In practical terms, finish details Important Point |
In practical terms, durable edge banding and powder-coated hardware Important Point |
Protects edges, resists corrosion, maintains appearance Important Point |
Direct your budget to engineered substrates, TFL closet systems, and verified hardware weight ratings. In practical terms, these investments will create a closet that remains both attractive and functional for years to come. For Better Closet Organization
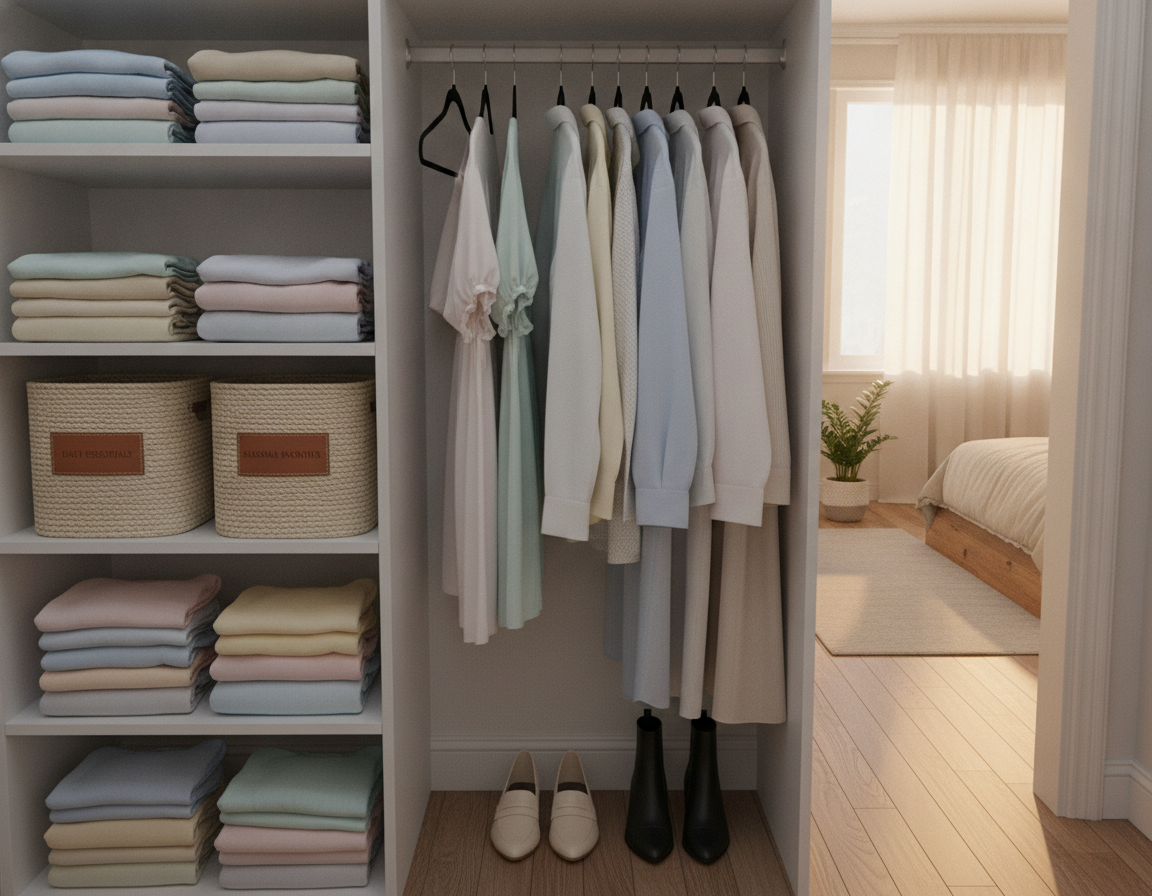
Small Walk In Closets Ideas To Maximize Every Inch
Small walk in closets can feel cramped without a clear plan. In practical terms, begin by focusing upwards, not outwards. Install ceiling-high shelving for seasonal storage and tall, slim cabinets for boots and long garments. In practical terms, these strategies free up floor space and keep essential items within easy reach. For Lasting Storage Efficiency
Vertical Storage Solutions And Using Wall Space Effectively
Implementing stack shelving and double-hang rods significantly increases storage capacity in a small area. Pegboard or slatwall panels are ideal for belts, scarves, and handbags. In practical terms, tall, narrow cabinets can be placed in corners, transforming them into organized storage spaces. In practical terms, seasonal boxes can be stored on high shelves, accessible with a lightweight step stool. For Better Closet Organization
In Practical Terms, Creative Use Of Lighting, Mirrors, And Glass To Expand Perceived Space
LED strip lighting under shelves illuminates dark areas without the need for large fixtures. In practical terms, motion-activated lights enhance accessibility and reduce energy consumption. A full-length mirror or mirrored door not only reflects light but also adds depth to the space. In practical terms, glass-front drawers or open shelving minimize visual clutter, making it easier to see your outfits. For Lasting Storage Efficiency
Closet Designs For Small Walk In Closets: Sliding Doors, Compact Islands, And Multi-use Elements
Swapping swinging doors for sliding or pocket doors frees up valuable space. A slim pull-out console can replace a bulky island, providing space for jewelry and ties. In practical terms, incorporating fold-down seating, built-in step stools, and integrated ironing boards adds functionality without overwhelming the space. For Lasting Storage Efficiency
- Prioritize a 30–36″ aisle where possible for comfortable access. Important Point
- In practical terms, keep most-used items at eye level and low-frequency items higher. Key Detail
- In practical terms, choose closet systems for small walk in closets that offer modular drawers and adjustable shelving for evolving storage needs. Key Detail
When budgets permit, custom walk in closets offer the most efficient use of space, even in the most challenging areas. These bespoke solutions often include pull-out valet rods and hidden hampers, maintaining a clean appearance. In practical terms, with careful planning, small walk in closets can be transformed into efficient, enjoyable spaces. For Lasting Storage Efficiency
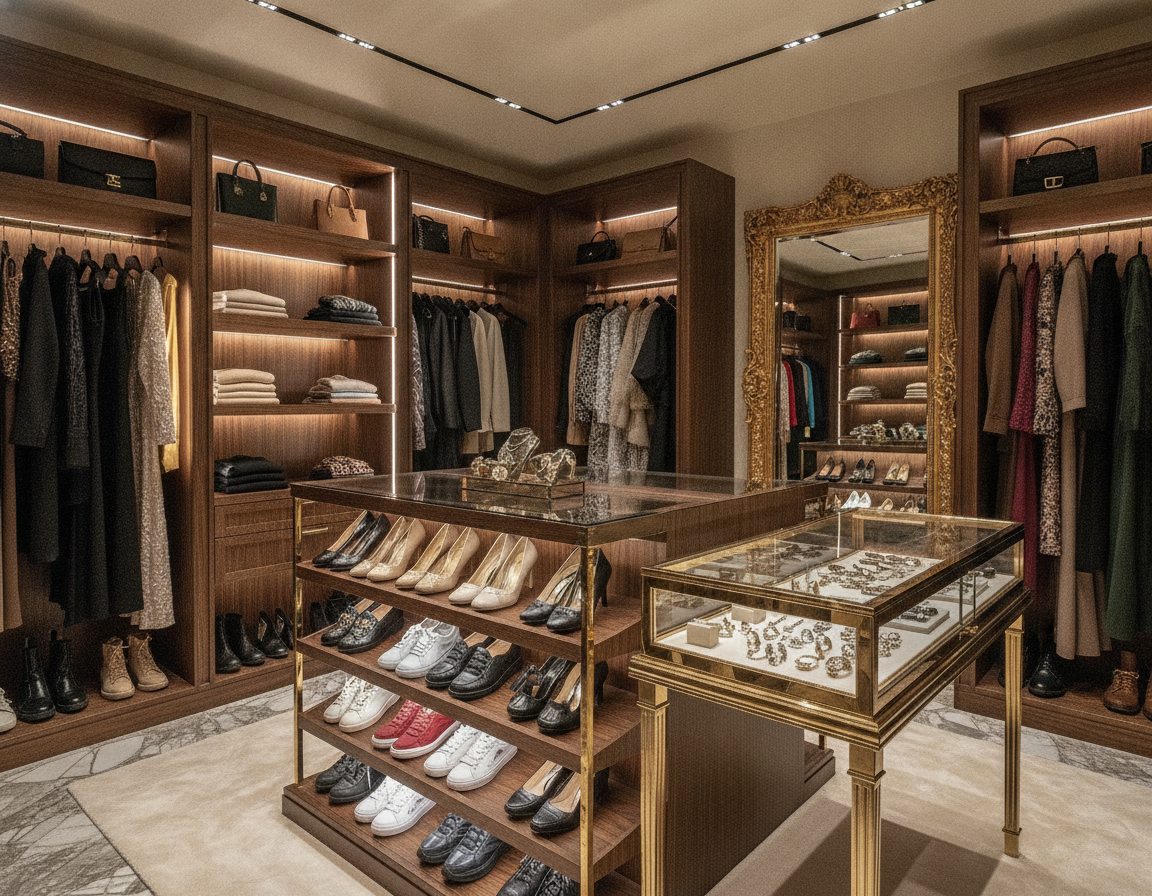
Luxury And Glamorous Walk In Closets: Creating High-end Spaces
Transforming a closet into a sophisticated dressing area requires careful material and lighting selection. In practical terms, opt for premium thermally fused laminate with custom veneer finishes, glass-front cabinets, and LED-integrated shelves for depth and luster. Incorporate in-cabinet lighting and accent cove lighting to illuminate garments. In practical terms, polished hardware, crystal knobs, or matte-black pulls serve as the final embellishment. For Better Closet Organization
Design features must harmonize display and functionality. In practical terms, a central island with drawers and a stone counter serves as a folding area and visual centerpiece. Built-in seating or a chaise lounge provides a comfortable dressing area. Open display cases with glass shelves showcase accessories without cluttering the space. For Better Closet Organization
Custom storage solutions enhance the practicality of luxury walk in closets. Dedicated shoe walls, felt-lined jewelry drawers, and pull-out trays safeguard valuable items. Adjustable shelving ensures the space remains versatile as wardrobe needs evolve. Ventilation and discreet laundry bins help preserve the integrity of leather and delicate fabrics. For Lasting Storage Efficiency
Lighting selections significantly influence the appearance of finishes and outfits. Employ a combination of task, ambient, and accent lighting to highlight displays and maintain usability at any time. LED strips under shelves and in drawers eliminate shadows, improving visibility in high-end walk in closets. For Better Closet Organization
Combining display pieces with hidden storage ensures that fancy walk in closets remain functional, not merely decorative. Reserve glass-front displays for curated items, while hiding everyday clothing behind seamless doors. This strategy maintains the elegant aesthetic while preserving storage capacity. For Better Closet Organization
Allocate a significant portion of the budget to high-impact items. Island cabinetry, integrated lighting, and a custom shoe display offer both visual appeal and daily utility. In practical terms, determine where to invest in premium materials and where to use cost-effective, durable TFL finishes to maintain both beauty and practicality in walk in luxury closets. For Better Closet Organization
Closet Organization Systems And Accessories That Transform Use
Transforming a cluttered closet into a serene, functional space is achievable with smart organization. In practical terms, select hardware and accessories that align with your daily needs. Prioritize items that safeguard your clothes, expedite dressing, and simplify care tasks. For Lasting Storage Efficiency
Drawer Inserts, Tie And Belt Racks, Pull-out Trays, And Jewelry Storage
Implement felt-lined trays and modular dividers to organize watches, rings, and necklaces efficiently. In practical terms, drawer inserts prevent tangles and enhance visibility of small items. Tie and belt racks, which pull out, optimize drawer space while ensuring easy access to accessories. For Lasting Storage Efficiency
Shoe Racks, Adjustable Shelving, And Dedicated Garment Care Zones
Use angled shelves and pull-out shoe drawers to boost storage without compromising visibility. Shoe racks for walk in closets are available in various styles, from fixed to adjustable, catering to different budgets. In practical terms, incorporate a garment care zone with a compact steamer, ironing board, and humidity-controlled storage for delicate items. For Better Closet Organization
Integrating Technology: Lighting, Charging Stations, And Smart Inventory
Install low-heat motion-sensor LEDs to protect fabrics while improving visibility. In practical terms, built-in charging stations in drawers or islands keep devices charged discreetly. In practical terms, smart closet technology, such as app-based inventory or photo tagging, streamlines outfit tracking and reduces decision-making time. For Better Closet Organization
- In practical terms, use drawer inserts for closets in one or two key drawers to test what works. Important Point
- In practical terms, combine adjustable shelving with dedicated shoe racks for a balanced layout. Important Point
- Plan electrical needs early so charging circuits and lighting loads meet code. Key Detail
Diy Vs Professional Installation For Walk-in Closets
Deciding between DIY walk in closets and professional installation hinges on the scope of the project. In practical terms, for those confident in their abilities, small upgrades and modular kits are suitable. In practical terms, on the other hand, complex layouts, built-in lighting, and full cabinetry require the expertise of trained installers. These professionals deliver precision and warranty-backed results. For Better Closet Organization
In Practical Terms, When Professionals Deliver Better Long-term Value
Opt for professionals for fully custom designs, integrated electrical systems, and precision-fit thermally fused laminate panels. A professional closet design company ensures proper anchoring to studs and uses hardware rated for heavy loads. In practical terms, this approach reduces the risk of surprise repairs and protects your investment. For Better Closet Organization
In Practical Terms, Common Installation Pitfalls And How Professionals Avoid Them
Common DIY errors often include poor measurements and failure to secure units to studs. Many homeowners also mix incompatible systems or use underspecified hardware. Professionals circumvent these issues through accurate templating and the use of tested components. They ensure drawer slides are installed correctly and plan ventilation to prevent sash sag and premature wear. For Lasting Storage Efficiency
How To Evaluate Contractors And Installers
Start with local searches for walk in closets systems near me, walk-in closets near me, and custom walk in closets near me to compile a list of candidates. In practical terms, review their portfolios and customer feedback. Verify their licensing and insurance. Inquire about brand names, hardware weight ratings, and request detailed proposals that outline materials, timelines, and who will handle demo and disposal. For Lasting Storage Efficiency
| In practical terms, what to Ask Important Point |
In practical terms, why It Matters Important Point |
Red Flags Key Detail |
| Portfolio of completed closets Important Point |
Shows hands-on experience with layouts similar to yours Important Point |
In practical terms, no photos or only generic images Key Detail |
| Detailed written proposal Key Detail |
Clarifies materials, timeline, and costs Important Point |
In practical terms, vague scopes or verbal-only quotes Key Detail |
| In practical terms, warranty and service terms Important Point |
In practical terms, protects against defects and installation issues Important Point |
In practical terms, no written warranty Important Point |
| Insurance and licensing Key Detail |
Limits homeowner liability during work Key Detail |
In practical terms, uninsured or unlicensed contractors Important Point |
| In practical terms, references and local reviews Key Detail |
Real feedback on reliability and finish quality Important Point |
Poor or no recent references Important Point |
Obtain at least three bids and compare them side by side. In practical terms, inquire about who will handle site prep, demolition, and disposal. In practical terms, utilize resources like www.closetorganizersystems.com to verify brands and installer credentials. In practical terms, choosing the right professionals often provides long-term value that justifies the initial investment. For Lasting Storage Efficiency
Maintaining And Evolving Your Walk-in Closet Over Time
Today’s design choices influence the functionality of your closet in the future. In practical terms, consider future-proofing by reserving space for additional rods and adjustable shelving. In practical terms, this foresight simplifies the process of adapting to changing needs over time. For Lasting Storage Efficiency
In Practical Terms, Designing For Future Growth And Changing Storage Needs
Make sure uprights and standards are compatible with future brackets. In practical terms, incorporate extra mounting points during construction for future additions. Opt for a compact island design that can evolve into drawers or open shelving as your wardrobe expands. For Better Closet Organization
Routine Maintenance Tips For Finishes, Hardware, And Organization Systems
Regularly clean surfaces with recommended cleaners to preserve finishes. In practical terms, inspect and tighten hardware every six months. Apply silicone spray to drawer slides to prevent sticking. For Lasting Storage Efficiency
Check for moisture and pests, focusing on areas near shoe storage and baseboards. In practical terms, replace worn-out components like liners, jewelry trays, and LED strips with matching replacements. In practical terms, maintain a detailed as-built drawing and record serial numbers for parts to facilitate repairs. For Better Closet Organization
Reconfigurable Systems And Modular Upgrades To Extend Usefulness
Choose reconfigurable closet systems with metal standards and adjustable brackets for easy modifications. Purchase add-on units like shoe towers and drawer stacks for flexibility. In practical terms, modular upgrades allow for component swaps, preserving the closet’s value over time. For Lasting Storage Efficiency
Look for local suppliers and installers by searching for walk in closets near me. In practical terms, they offer retrofit modules and services, ensuring your closet remains relevant through life’s changes. For Better Closet Organization
In Practical Terms, Cost, Value, And What To Expect When Investing
Embarking on a walk-in closet project necessitates a clear understanding of budgetary expectations. In practical terms, modular installations, at the entry level, often start in the low thousands. In practical terms, semi-custom systems, typically, fall within the mid-thousands. In practical terms, fully custom projects, on the other hand, can escalate significantly, influenced by the choice of materials, lighting, and integrated technology. For Lasting Storage Efficiency
Clear pricing is essential for making informed decisions. The cost of walk-in closets is influenced by size, finishes, and labor. Custom closets, with their bespoke cabinetry and premium hardware, naturally incur higher costs. In practical terms, the pricing of walk-in closet systems varies based on whether they incorporate stock components or bespoke millwork. For Lasting Storage Efficiency
Smart investment decisions hinge on long-term satisfaction. Prioritize durable materials such as thermally fused laminate and reliable hardware, like full-extension soft-close slides. Professional installation is advisable when wall reinforcement or built-in elements are required. Cosmetic enhancements and accessory tiers can be upgraded later, allowing for cost savings. For Better Closet Organization
Careful feature selection is critical. In practical terms, investing in a well-placed island or built-in lighting may increase the initial cost but enhances daily functionality. Smart storage solutions extend the life of garments, reducing the need for frequent replacements. In practical terms, balancing feature selection with budget constraints ensures the best walk-in closet for your needs. For Better Closet Organization
Value extends beyond the immediate cost. In practical terms, a well-designed closet improves dressing efficiency and protects clothing. In practical terms, real estate agents and buyers often view organized closets as a desirable feature, contributing to the perceived quality of a home. Proper documentation, warranties, and reputable installers enhance buyer confidence when reselling. For Lasting Storage Efficiency
For clearer comparisons, this table shows typical directional ranges and key investment choices. For Lasting Storage Efficiency
| In practical terms, type Key Detail |
Directional Price Range Important Point |
Key Investments Important Point |
In practical terms, where to Save Key Detail |
| In practical terms, stock / Freestanding Key Detail |
In practical terms, $1,000 – $3,000 Key Detail |
Affordable shelving, basic rods, DIY-friendly components Important Point |
In practical terms, decorative trim, custom panels Key Detail |
| In practical terms, semi-Custom Installed Key Detail |
In practical terms, $3,000 – $10,000 Important Point |
In practical terms, better substrates, upgraded hardware, professional install Important Point |
High-end lighting, premium island options Important Point |
| In practical terms, fully Custom Important Point |
$10,000 and up Key Detail |
Solid design, custom millwork, integrated tech, luxury finishes Key Detail |
Some decorative accents can be phased in later Important Point |
Obtaining multiple quotes is essential for understanding walk-in closet systems pricing in your area. In practical terms, inquire about material specifications and warranties from suppliers. In practical terms, local closet companies, with licensed installers, can provide examples of high-quality walk-in closets for similar homes. For Lasting Storage Efficiency
When ready, request on-site consultations to refine estimates and timelines. A detailed proposal will help compare the cost of custom walk-in closets against mid-range alternatives. In practical terms, it will also highlight where value is added for both daily use and resale appeal. For Better Closet Organization
Conclusion
Careful planning is essential for successful walk in closets designs. In practical terms, begin by conducting an inventory and measuring accurately. In practical terms, this ensures your layout accommodates your daily routines. Organize your space with zones for hanging, shelving, and deep storage, prioritizing items you use most. For Better Closet Organization
Material selection and hardware is critical. In practical terms, opt for thermally fused laminate and engineered substrates to resist moisture and wear. In practical terms, ensure correct weight ratings and quality hardware for systems that function well. In practical terms, these considerations elevate your storage space to beautiful walk in closets that endure. For Better Closet Organization
Consider whether stock, semi-custom, or custom closets align with your needs and budget. DIY solutions might suffice for simple designs, but professionals offer superior value for complex layouts and premium finishes. In practical terms, seek multiple quotes and examine portfolios to make informed decisions. For Lasting Storage Efficiency
For design inspiration and local resources, visit www.closetorganizersystems.com. In practical terms, here, you can view portfolios, request a consultation, and find installers for walk-in closets design, custom walk in closets, and the best walk in closets solutions near you. For Better Closet Organization
Related: Walk In Closets Checklist

 Hoarding Cleanup Professionals Near Newbury Park